Illustrator, Tutorials
How To Apply Shadows To Characters & Objects In Illustrator
This post first appeared on www.vickiwenderlich.com.
Say you have a cute little character or object for your game, and you’ve applied gradients to make it look three-dimensional. But you want something a little more to make it pop out of the page and into the user’s imagination.
The answer is probably this: it needs a shadow! In real life, everything has shadows. Read on to learn how to give the characters and objects in your illustrations their own shadows.
Types Of Shadows
There are two types of shadows that you can apply to your object:
Drop Shadows, which make the object visually feel like it’s popping off of the page, or is in front of other objects.
Shadow Shapes, which approximate where the real shadow would fall if the scene were three-dimensional.
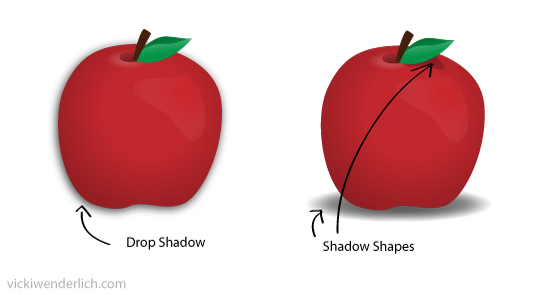
You can apply one or both types of shadows to your game objects and characters.
When To Use Drop Shadows
Use a drop shadow on objects or characters when they need to look like they overlap. For example, without the drop shadow on the apples below, they blend into each other.
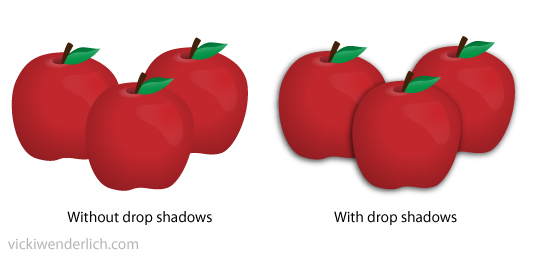
Drop shadows also help objects pop out of the background. For example, game controls (like a Play or Pause button) with a drop shadow will make it clear that they are not part of the action going on behind them.
When To Use Shadow Shapes
Shadow shapes are used to create a sense of three-dimensional space in the scene. Many games with a three-quarters top-down view like Fieldrunner below use them so that the characters appear to be above the plane of the ground.
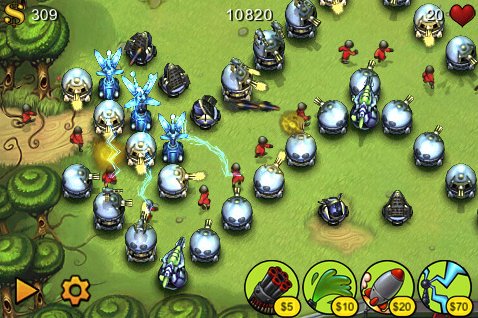
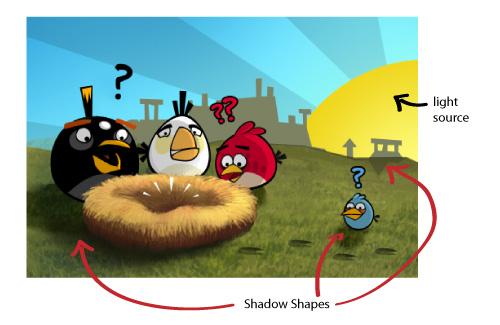
Shadow shapes are also used for marketing materials like screenshots or ads, or for special illustrations in the game. For example, in the Angry Birds story or menu scenes, you can see shadow shapes underneath the characters.
We’re going to walk through adding both types of shadows to this bird you worked with in a previous tutorial.
Download the Illustrator file here; it has the bird and background all ready to go!

Tutorial: Apply A Drop Shadow & Shadow Shape
First things first: Where is your light source?
When placing the shadow, think about your light source. If the light source is directly overhead, the shadow will be directly underneath. If the light source is slightly to the right, the shadow will be slightly to the left.
For this bird, the light source is overhead and slightly to the right (this was decided in the previous tutorial involving the bird).
Add The Drop Shadows
We need three drop shadows: one on the body, one on the left wing, and one on the right wing. This is to emphasize that the wings are in front of the bird’s body. You can see a similar application in the Pen Tool Tutorial – each part of the cat and mug got a drop shadow so you could see how they overlapped.
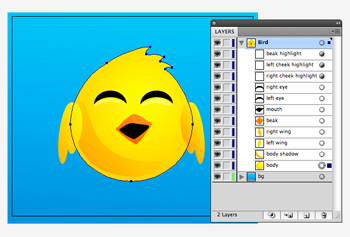
Go to the Layers palette, and select the Body layer. Go to Effect>Stylize>Drop Shadow.
Click Preview. That will show you what the shadow looks like, and you can see the changes when you alter the rest of the controls.
Since our light source is overhead and to the right, we want our shadow to be underneath and to the left. Put the Y Offset at 2 and the X Offset at -2. Change the blur (the size of the shadow) to 3.
Here’s how the X and Y offsets work in Illustrator:
Positive Y values: shadow moves lower
Positive X values: shadow moves to the right
Finally, decrease the shadow opacity to 50%. Click OK.
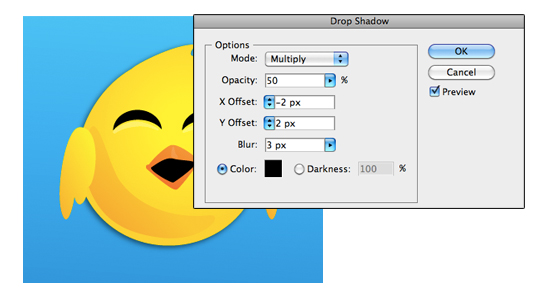
We want the shadows on our wings to be the same as on the body. Luckily, that makes our life easy! Just select both wings (hold Shift while selecting to select multiple shapes), go up to Effects and click “Apply Drop Shadow”.

As you can see, now our bird has wings that are visually covering up part of his body, and the whole bird stands out more from the background.
Create A Shadow Shape
All that’s left is a shadow underneath the bird so that he looks like he’s on top of a table or other flat plane rather than just laying on that blue background.
Most of the time, a simple oval shadow will be fine. So the first step is to create an oval!
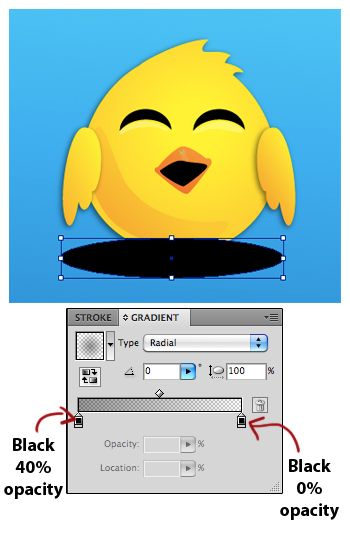
Select the Ellipse tool (or press L) and drag out an oval underneath our bird.
Place it just slightly to the left, since our light source is overhead and to the right.
Next, go to the Swatches panel and click on the Black-to-White swatch to fill it with a black and white gradient.
The actual gradient doesn’t matter because we are about to change it.
Go to the Gradient panel. Change the gradient Type to Radial.
Doubleclick the left color stop and change it to black, with an opacity of 40%. Change the right color stop to black with 0% opacity.
Right now, our gradient is cut off by the bounds of the oval rather than fading out like a shadow. To fix this, we need to edit the gradient using the Gradient tool.
Select the Gradient tool (or press G). Pull the black circle on the top of the radial gradient’s perimeter down until it is just inside the oval. This squashes the radial gradient so that it fades out while still inside the oval shape.
Next, drag the left color stop a little bit to the right. This increases the area with the full 40% opacity so that the shadow seems to originate from an oval center rather than just a point.
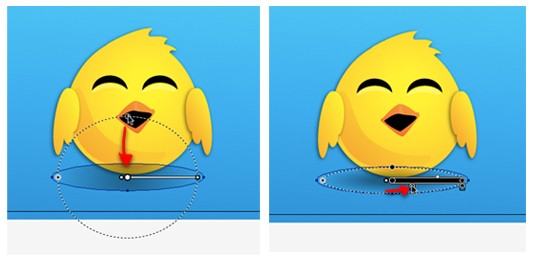
Now the shadow looks like it is caused by the body, and fades out as it reaches its edge.
Finally, go to the Layers panel and drag the shadow oval underneath the bird body.
Here’s our finished bird:

Remember, you can apply either a drop shadow or a shadow shape, or both. Choose what works for your illustration! Each type of shadow brings a different aspect of three-dimensionality to the scene.
If you’ve used one or both types of shadows before, I am curious: which type do you use more often, and what types of objects/characters do you use each type on?



good :)
Love it, nice explanation about the shadows, it seems so easy when you read it!!
This is an excellent tutorial! Thanks for taking the time and effort to post this up for free :)