Articles, Illustrator, Photoshop, Tutorials
FAQ: How Do I Save Art For The iPhone/iPad?
This post first appeared on www.vickiwenderlich.com
I have gotten a few frequently asked question by artists creating art for the iPhone for the first time. They usually concern file types and how to save the art to send to the programmer.
Here are some answers:
What file type should iPhone or iPad art be?
The iPhone is optimized for PNG images, so that is the file type you will save ALL your app art as. (the file extension will be “.png”) No matter how you create the image (Photoshop, Illustrator, Inkscape, etc.), you will save it as a PNG.
Do I need to save different images for the different iPhone screen resolutions?
Yes.
Older iPhones have a 320×480 pixel screen size. Newer models have double the resolution, or 640×960 pixels. You need to give your programmer the same art but in two different resolutions (or give him the higher resolution version if he shrinks it himself using a tool like TexturePacker).
You can find the pixel sizes for common elements like backgrounds, toolbars, and buttons listed here.
If you don’t know the pixel sizes needed for something, ask your programmer.
Why does retina-sized art look so big on my computer?
One thing to note is that when creating art for the retina screens, your art will look HUGE on your computer screen. This is because the retina screens are double the resolution that the older iPhones and your computer has – in other words, they pack more pixels into the same space.
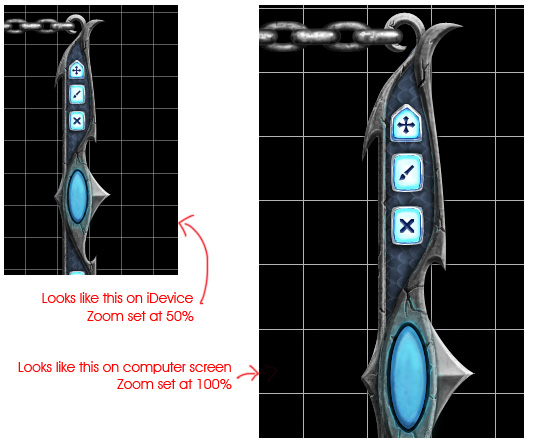
To overcome this, I usually decrease the zoom level at which I am viewing the art to 50%. This way the art looks approximately the same as it would on-screen. Keep in mind that this can make things look a little blurry or choppy on your computer screen. If you are concerned, zoom in to 100% to check that the lines are in fact crisp, and then zoom back out.
I often work at about 66%, zooming in to 100% or more to work on details and out to 50% frequently to check how objects and effects are relating to the overall screen size.
Which resolution should I create first, regular iPhone or iPhone Retina?
This is debatable. Some artists create the smaller one first and scale up, some create the larger one and scale down.
I usually create the art for the Retina screen and my programmer scales them down using a tool called TexturePacker. However, you can also scale down the art yourself for the low-resolution version.
In other words, say a button is 60 pixels wide and 32 pixels tall on the older iPhones. You need to save this button at 60×32 pixels and also 120×64 pixels. I would create the 120×64 version and scale down for the 60×32 version.
Tips:
- Keep in mind that your art will be scaled down 50% as you create it. This means make strokes an even pixel width (4 pixels rather than 3) so that when they scale down they will still be crisp.
- If you want to create the smaller one first and scale up, the art needs to be all vectors. Raster objects (like photos or brush strokes) will get blurry if you try to scale them up. If you need to use raster objects, create the hi-res first and scale down for the low-res.
- To get the highest quality user interface art, with really nice, crisp lines and textures, you will need to make two different documents in Photoshop, one for each resolution. This way you get the most control over your pixels and can make sure each image is perfect, rather than relying on Photoshop to scale it for you, which sometimes can result in blurriness. You can also add textures and detail to the hi-res version and leave it out in the low-res version. This is expensive (since it takes longer), so we don’t do it unless the app really needs it.
What size do I make my document?
This concerns Photoshop, where you have to choose a document size in pixels.
If you are just creating a single object, make your document the exact pixel size of the art you will be creating. So for the button, make your document 120×64 pixels.
Most of the time, you will be making art for an entire screen: backgrounds, toolbars, buttons, etc. In that case, make your document the size of the screen you are developing for. For the iPhone, make it 640×960 pixels. For the iPad, make it 768×1024 pixels.
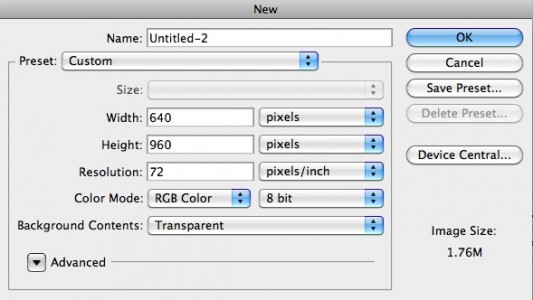
Then you would make your mockup. Once everything looks good to you and your client, you would save all the components individually. Saving art from a Photoshop mockup is the topic of a future tutorial, but for now, remember that all your objects must be saved out individually.
I’ll say it again:
Each object must be saved separately.
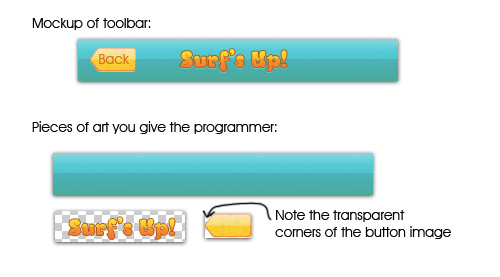
This is very important. An app is comprised of different elements placed on top of each other (buttons, characters, arrows on top of the background). Each object MUST be a separate piece of art so that you can put them in a new document as save them individually with transparency. This is because things in an app often need to be moved around, and if there is no transparency you are stuck with rectangles.
For example, buttons almost always have rounded corners. This means their PNG will need to have transparency in the corners so that the background can show through.
One programmer I know was recently frustrated because his artist made a nice mockup, but he’d applied filters to the artwork as a whole. This meant that he could not copy and paste buttons into a new document to save them because they would lose the effects of those filters (since the background was no longer behind them).
This was a huge headache for both the programmer and the designer, but it can be avoided if the artist understands how the art will work together in the app.
Here’s an example of a toolbar, and the pieces that the artist should be sending to the programmer (that grey and white checkerboard signifies transparency):
Okay, So How Do I Save The Art?
We want the art as PNGs. Here’s how to save the art in Photoshop and in Illustrator:
How To Save Art For The iPhone In Photoshop
In Photoshop, go to File>Save For Web & Devices, and choose PNG-24. Make sure the transparency button is checked. Then click Save, and give it a name.
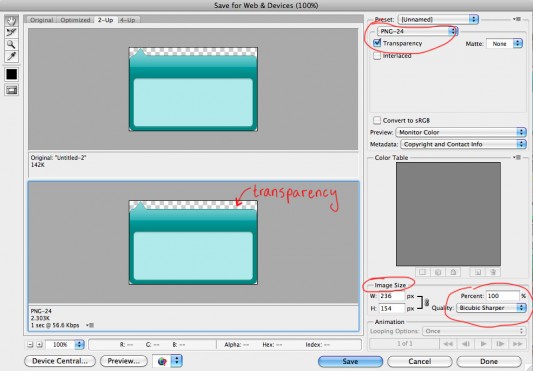
In this dialog, you can also resize the image. If you saved the Retina (hi res) version first, to save a low-res version choose File>Save For Web & Devices again.
Choose the Bicubic Sharper method using the dropdown menu under the Percent field. Then change the percent to 50. The size of your image will update immediately. Click Save and give it a name.
Edit: Some designers have pointed out how this method results in lesser-quality images for some things. It is more evident in user interface components like buttons, and to overcome this they say you should always vector scale the button. You can read more here. I understand that bitmap scaling is not ideal for most user interfaces—however, it is also completely okay to bitmap scale if you are working with mostly illustrations, or if your client is happy with the tradeoff in quality for the savings in time spent (and thus money). We bitmap-scale our images and it works for our apps, but we recognize that we aren’t getting the most precise, crisp lines in certain areas. It’s a trade-off. /Edit
If you created the low-res first and are scaling up (and your art better be made of vectors if this is the case), you should scale up before you use Save For Web & Devices. Go to Image>Image Size. Make sure Scale Styles and Constrain Proportions are checked. Double the pixel width, which should automatically double the height. Make sure Resample is checked, and choose Bicubic Smoother. Click Ok. Save For Web & Devices as before.
How To Save Art For The iPhone In Illustrator
In Illustrator, make sure the artboard you want saved is selected. Then go to File>Save for Web & Devices. Choose PNG-24 and make sure the transparency button is checked. Click Save, and give it a name.
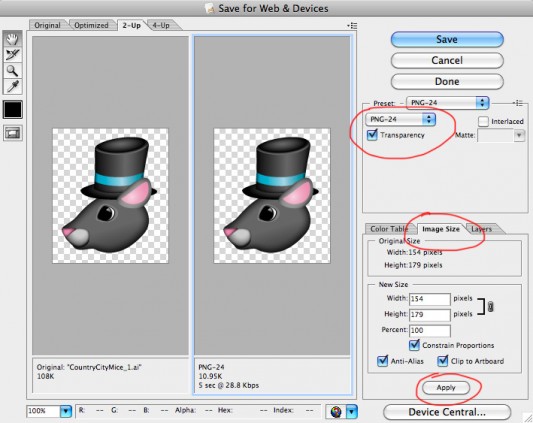
Again, this dialog also has options for resizing. To resize an image, go to the Image tab and change the percentage. Make sure to click Apply before you click Save – otherwise your change is not applied. Since Illustrator uses vectors, you can scale up or down.
More Questions?
Hopefully these answers will help some of the artists out there who need to make iPhone art for the first time!
If you have another question about how to save art for an app, please ask! And programmers, if there are other things you wish artists understood about iPhone or iPad art, leave a comment or send it to me through my Contact form.


Hi Vicki,
thanks for another great tutorial! This is perfect for my designer who does occasional iOS UI work.
Here is a question for you: On rectangular artwork, do you recommend to pay extra attention to switching transparency OFF when saving as png?
I always try to do that because transparency can cause quite some overhead and slow things down, but I’m not sure how much that actually plays a role with rectangular artwork anyway. If you have an opinion there, that would be a nice clarification.
Thanks again. You (and Ray) are missed dearly here in the Southwest, do you plan to go to GDC?
Hi Marcus!
I checked with Ray, he says that it does not matter when saving the artwork itself; they can leave the transparency box checked. It matters in the code – you should set it as “opaque” so that the operating system does not treat it as if it has transparency.
And sadly we probably won’t make it to GDC this time around :[ Wish we could – it would be great to see you again!
Scaling art down 2x using Photoshop’s Bicubic filter isn’t optimal. It will make the smaller images just a bit too blurry, while clarity is very important at such small sizes.
I wrote a blog post about this: http://www.hollance.com/2011/04/drawing-retina-graphics/
You can easily see the difference in quality between Photoshop’s Bicubic scaling and my ShrinkPng tool. Unfortunately, I don’t have an artist-friendly version of that tool.
Hi
I have a question, why in the retina resolution only puts 72dpi?
The iphone 4/4s has 326dpi
@moosc: In the Photoshop document, it doesn’t matter what your dpi is (in this case). The retina screen is 640×960 pixels, so that’s the size of your document. That’s why it appears so large on your computer screen, when the actual art will be crammed into the tiny retina iPhone screen at a higher dpi.
oh, programmer with artist, perfect couple.
So, at what resolution/ppi does an image have to be imported to an Illustrator file in order to be exported to an iPad slice, since the iPad is a 132ppi device? And since one can enlarge the page on an iPad? And is there a special way that you would set up the Illustrator file, or just set it up as a web page at 1024 x 768?
@Valerie: What’s important isn’t the resolution, it’s the number of pixels (ppi is only important when printing). For the iPad, the screen is 1024×768 in landscape mode, so create your work to fit in that screen. There’s no special way to set it up, just a web document with a 1024×758 pixel artboard.
If you want an image to fit within that screen, it needs to be less than 1024×758 pixels.When you export, choose “Save for web”.
Well, then I guess the image needs to be @72ppi to fit into an Illustrator web page then, but will display okay on the iPad? I did a test and saved a 100x100px image 2 ways: once at 72dpi and once at 132dpi. When I placed them both in a 100x100px Illustrator web page, the 72ppi file covered the entire page, but the 132ppi file was reduced to 1/4 of its original size. And when an image is “saved for web,” will its resolution be okay for the iPad, which is a 132ppi-resolution device?
@Valerie: how are you saving the image – what program? dpi is not important on screens, I never save anything in terms of dpi. The only thing that matters is the total pixel width and height of the image.
hi there,
I’m wondering what is the best way to draw art work for iPhone games. I’m looking to draw a background for a game, and I want the background to move from left to right as the player is moving in the same direction.
what is the best way to draw continuous background and to make it smooth with no cuts/overlay ?
Hi,
Making seamless backgrounds is definitely an art. You need to make sure the left and right edges match up. My advice, especially for the first time, is to use smooth top-to-bottom gradients on shapes that are on the edges, without noticeable textures. Make sure any lines that cross the border on the right have the same angle and pixel height/position as on the left. I have only made a couple so I can’t help much more than that. To see an example you can look at my Rocket Mouse game pack.
Any one else have tips?
Hi theres,
My question doesn’t concern saving images for iphone. I am , in general, interested in saving images for web.
I understand that normal monitors are at 72 dpi. While the desktop retina display is at 220 dpi.
“Saving for web” option in illustrator will only save at 72 dpi. As you suggested, reducing the size by 50% will certainly make the image dispaly at right size on a retina screen but will appear a lot smaller on normal screen…How do i sort this out?I am having a lot of trouble here
Hi – great article. Thanks. Unfortunately, the images aren’t displaying. Can you check that?
Working on fixing that – thanks for the heads up!