Game Design, Tutorials
How To Size Game Art
This post first appeared on www.vickiwenderlich.com
I had a recent discussion with a developer who was creating art for a game for the first time. Previously, he had worked with a designer that gave him the art, but now he needed to make his own graphics.
He ran up against a problem right away: He didn’t know how to start.

He had the following questions:
- Do you make the Retina art or the Unretina art first?
- How does the iPad art relate to the iPhone art in size or proportion?
- How big do you make the art? As in, how big should the game elements be, like a paddle or a ball?
This article is the result of our discussion, since we felt that these notes could help other developers in the same position.
If you have some of the same questions about creating game art, read on for answers!
Let’s take these questions one by one:
Do you make the Retina art or the Unretina art first?
The Retina art. You can scale down the art for the Unretina version more easily than you can scale up, especially if the art is not entirely vector-based (if you need textures, for example). Some people work the other way around, and that’s fine too – but making the Retina art first and scaling down is definitely easier for beginners.
If you are creating a universal game, however, the process is slightly altered (at least for me. Other artists may work differently). This is because of how the iPhone and iPad art sizes relate, which is covered next.
How does the iPad art relate to the iPhone art in size or proportion?
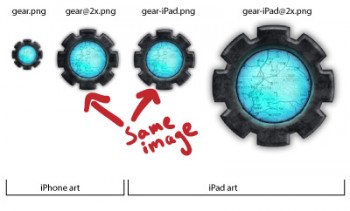
if you are making a universal app, you will need Retina and Unretina versions of each image for both iPad and iPhone. That is, four different images:

- iPhone Unretina: image.png
- iPhone Retina: image@2x.png
- iPad Unretina: image-iPad.png
- iPad Retina: image-iPad@2x.png
Except for backgrounds, we make iPhone Retina art the same size as the iPad Unretina art.
That means that image@2x.png is the same exact piece of art as image-iPad.png. Then we scale this art down (scaling the art in the vector-based program, not scaling the PNG) to 50% for iPhone Unretina and scale it up to 200% for iPad Retina.
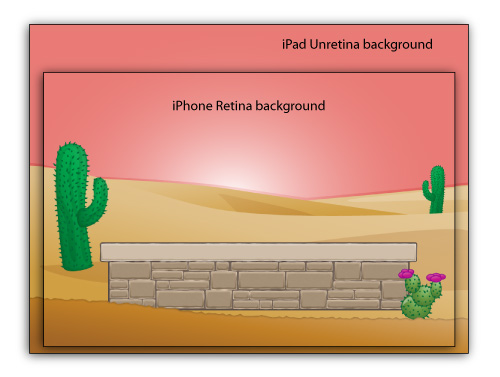
For backgrounds, the iPad Unretina background is still based off the iPhone retina background – it’s just that you can see more of it due to the larger screen. Then the iPad Retina background art is scaled up, and sometimes more detail is added.

How big do you make the art? As in, how big should the game elements be, like a paddle or a ball?
The good news is, there are no standard sizes. Make the art whatever size looks good on the screen. If you create your character and he looks good at 200×200 pixels, make him that size.
The bad news is, there are no standard sizes. No helpful guidelines that tell you how many pixels tall your pirate main character should be, or how many pixels in diameter a cannon ball should be.
Naturally, this leads to another question:
How do you figure out what size looks good?

If you are opening a document to make your character for the first time and you don’t know what size to make the document, it’s because you’ve missed a step. First you need a mockup of your game!
Here’s how to create the art for your game:
- Create a document that is the size of your Retina device screen. If you are developing a landscape game for the iPhone, that means a document with width 960 pixels and height 640 pixels.
- In this document, create your background. Even if you don’t know yet quite what the background will look like, just make a rough draft with colors close to what you have in mind. When finished, group the background components (in Illustrator, put them all in the same Layer and make a new Layer) and lock them.
- Next, make all your game elements within this document. This way you can size your objects –whether they are ill-tempered birds, paddles, balls, chess pieces, gold stars, or italian plumbers — relative to the screen.
- Note that since you are creating Retina art, you will have to zoom out to 50% to see it at the size it will appear on the device (unless of course you have the new MacBook Pro, which has a Retina screen).
- Zoom in to work on the details; zoom out to 50% to get a feel for the relative sizes while seeing the whole screen at once. It’s perfectly fine to make an object 300 pixels wide, decide it’s too big, and scale it down to 200 pixels. There are no rules for game piece sizes. Make them whatever size looks good. Group the element’s parts (just like you did for the background) before moving on to the next element. It’s okay to go back and make changes, too.
- Note that for UI elements like toolbars, tab bars, text fields, etc, Apple has specific guidelines. Check the HIG or, for the simple stuff, this article for exact pixel sizes needed. But for the actual game, sizing is up to you.
- Last (but important) note: Apple recommends that anything tappable should be a minimum of 88 pixels wide and tall on Retina screens (so 44 pixels wide for Unretina). If the player needs to be able to move or tap an element in the game, it needs to be tappable. If the element is smaller, you can make an invisible area (either in the sprite or in your code) around the element to make it big enough to tap.
- Once you complete the mockup, with all your game elements sized the way you like them, save out the different elements.
- In Illustrator, this is easy: just drag each element off the background and give it its own artboard, then save that artboard.
- In Photoshop, you need to copy the element into a new document (duplicate the layer or group of layers into a new document) and then trim the extra space away (Image>Trim) before saving.
- Save everything as PNGs.
- This gives you your Retina art. Now scale down to get your Unretina art. To get the Unretina versions, you have two options: use an image resizing app created by other developers for exactly this purpose, or scale down and resave your Photoshop or Illustrator documents. In Illustrator, you can scale down the art within the Save For Web & Devices dialog (under the Image Size tab). In Photoshop, choose Image>Image Size and scale down 50%. Don’t forget to check the box that says “Scale Styles”. Then save as usual.
Final Thoughts
If you are a first-time game art creator (or game artist wannabe), I hope that these guidelines help you start your projects!
Remember that these are things I have figured out over time. I’ve made every mistake in the book as I learned, and there still may be better ways to go about making game art for the iPhone and iPad. It would be helpful if other artists would chime in below in the comments. How is your process similar or different than the steps outlined above? Do you have any other important key points for total beginners making their very first set of game art?


Fantastic article!
I recently discovered raywenderlich.com’s blog, and liked it for the same reasons I like this one. Informative, light-hearted, straight to the point. I just wish I knew about you guys when I started writing for iOS.
And I just wanted to say hello. My name is Mario Wunderlich, and I make games for iOS.
I think it would be important to consider the new iPad retina size as well; if you simply make the art as big as possible in the beginning, (even if you don’t use it) it would be easier to come back to if you decide to implement it later.
Great article !
I’m creating a tower defense game on iPhone, also support Retina screen. Could I make all graphics in game by pixel art (tower, characters, enemies, backgrounds…). I’m a developer, not professional artist, I has just seen some tutorial about pixel art, and I think I could use pixel art for make graphics in my game :).
Could you have any advice for me ?
Thanks in advance,
Best regards,
@KenjiLe – Yes, you could make all the graphics pixel art – just know that it is going to be a lot of work. I’d recommend sketching out and making “placeholder art” quickly so that you can figure out what exact pixel sizes you need the art to be – one downside to pixel art is that if you decide it needs to be 10 pixels larger, that is very difficult to do.
Good luck!
Hey,
Love your site! Thanks :D
I’ve just created a table that sums up what you wrote here and in your other articles about graphics for iOS devices.
You can download it here: https://www.dropbox.com/s/guyncbkyxo2j6ud/iOS%20Devices%20Graphic%E2%80%99s%20Sizes.pages
it’s not much, but it really helps me as a beginner.
Thanks, Anton Begehr
Many thanks for your advice !
Currently, i’m start study and creat my game art by pixel art
Awesome, glad this helped! Good luck :]
Hi Vicki
I have a couple questions as I am new to both iOS development and iOS art. So I am making a trivia game with custom UI elements, text boxes, buttons, basic imagery etc. After reading this article what I take from it is, I should create a mock up, so with the new iPad 3 with retina, do I create a mock up background image of 2048×1536 in something like photoshop and create my custom UI elements to match those dimensions or do I create a mock up image of the dimensions of the iPad 3. I am kind of confused on how to do this. What I have so far is a custom background with a dimension of 2048×1536 and a custom text box which acts as a container for a UILabel View and this is 1653×526. Doesn’t this make my app quite large.
Yes, create a document in Photoshop with dimensions 2048×1536 pixels. Create your background in that, and on separate layers create your other art, like UI elements and buttons, etc. Lay them out on the screen like you want them laid out in the app, so that you can see how it will look. I don’t know anything about using custom text boxes as containers for UILabel Views, that sounds like a programming question :]
Thanks Vicki that helps out a lot
Hi, love your tutorials btw…but two questions. i currently did my artwork already on a huge size because i had no idea it would be a problem. I figured if you place them it did not matter the size. Apparently its taking up memory space. So my question is, is there a way to resize smaller? i tried going to image>size but it became pixelated. thank you!
sorry i have another question.
Is it possible to take every effect made on one image and apply it to a new one to be exactly like the other.
Ex: i have a font with gradient effects…but i made it into an image. and i want to make a new font with the same effects as the old one but in a different art board.
It would help to know what program you are using – I will assume Photoshop? You can copy and paste layer effects between layers. You need to go back to the text where you applied the layers, copy the layer effects, and paste the layer effects onto the new text. If you rasterized the text (which I would say not to do – always keep the original PSD files and save PNGs for your app), you will have to apply the layer effects manually again to the new text. I hope this helps!
Hi Miguel,
Yes you can resize smaller – if you are working in Illustrator you can resize the art (not the image you saved out, but the art in Illustrator) when you save it: go to Save For Web & Devices, and under Image size you can make it whatever size you need. If that doesn’t help, give me a few more details like what program you are using and what kind of art it is (pixel, vector).
Yes both helped very much!!! Thank you so much!!!
i ran into another problem and this is with illustrator…i wanted to make a simple animation with the same background.
So i the plan was to save 4 png pictures with a flash at 4 different location.
so i just moved the flash and save 4 times
but for some reason when (idk if you ever used game salad) but when i loaded them into there animation i realized all the 4 pngs saved in different sizes =/ please help if you can thank you!
Hi
what’s the size of the background image, if i am
planing to make an app for an universal ios devices ??
thank you
You need 4 backgrounds: one each for the iPhone, the iPhone retina, the iPad, and the iPad retina if you are making a universal ios app. http://www.vickiwenderlich.com/2012/07/iphone-ipad-basic-screen-component-dimensions-updated-for-retina/ Check here for screen sizes!
Hi, excellent site and super-useful articles.
I ended up on this site while looking for free game art to test a few things out and noticed your tutorial section. Thanks!
And…. yes I do have a question :)
Question 1 –
With iPhone5 now in the mix which comes at 1136 x 640 (instead 960×640) what do you do when you create your initial Retina Art?
Do you work at 960×640 so that you can simply scale down by 50% for Unretina and forget about the extra 176 pixels on iPhone5?
Or do we have to package (for a Universal Build) 5 sets of graphics with one set dedicated to iPhone5? Of course it is a good idea to make the most of the bigger iPhone5 screen, but wondering if you create dedicate art assets of it or still manage to scale things up/down
Thank you for your help!
OH, I saw your other tutorial just now: http://www.vickiwenderlich.com/2012/11/four-ways-to-deal-with-the-longer-iphone-5-screen/
useful article and comments.
Vicki, for those of us just starting out, are there other lower price software other than Illustrator & Photoshop? Could Pixelmator, Acorn, Gimp or Inkscape work also? I am a IOS (so Andriod) app/game coder.
Thanks Again Vicki for your great contributions.