Tutorials
Tutorial: How To Create A Seamless Texture in GIMP
Jun
This post first appeared on www.vickiwenderlich.com.
Often, we need a textured background, or a texture to overlay other objects. Most of the time we need a seamless tile so that it can repeat indefinitely.
We use seamless texture tiles in website backgrounds, as pattern swatches in Illustrator or Photoshop, and even to create dynamic textures in game graphics (as seen in Tiny Wings, for example).
Unfortunately for Photoshop lovers, there is no truly easy way to make a seamless tile in Photoshop.

Fortunately for us all, GIMP makes it ridiculously easy to do just that. And GIMP is free! If you don’t have it, go download it here. It’s worth downloading for this feature, even if you already have Photoshop.
We’re going to focus on creating a randomly generated texture, but you can apply this method to a photo as well.
Step 1: Create the random texture
Open A New Document

Open GIMP. Go to File>New. Enter the size you want your tile to be; I chose 200×200 pixels. Click OK.
You now have a blank canvas. Make sure your background and foreground swatches (in the Toolbox panel) are set to the default white and black.

If they are not, click the little black and white swatch icon next to the background and foreground swatches.

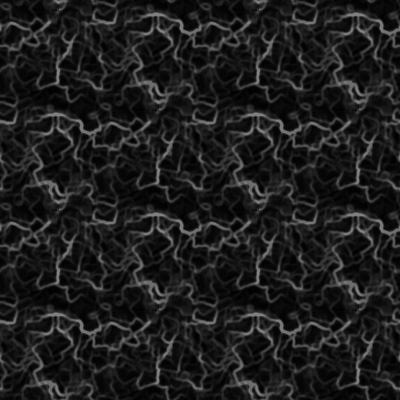
In the menu bar, go to Filters>Render>Nature>Flame. In the dialog that pops up, you can change the settings around if you wish and see a small preview.
Flame is a very variable filter – you will get something completely different each time. You can find all the variations by clicking the “Edit” button at the top.
Click OK.
Filter Results

This is what I have; you will have something else depending on how the Flame filter worked. Let’s see how it looks tiled:

Yuck, those seams are ugly. So now let’s use the power of GIMP to get rid of them!
First, however, let’s save the image.

Go to File>Save, navigate to the folder you want to save the image in, and type in a name.
I find it helpful to put the image size after the name so that when I’m looking for it later I can easily choose the right image (I often have different sizes of the same image).
I chose “texture_flame_200”. GIMP will save it as a .xcf file.
Step 2: Make the Tile Seamless

Go up to Filters again and choose Filters>Map>Make Seamless.

Done.
Yes, it’s that easy. Why Photoshop doesn’t have this capability, I have no idea.
Keep reading to see it tiled!
Try It Out In A Web Browser
Most of the time, you can’t get the real effect of the texture until you try it out. Sometimes there are annoying patterns that make the texture look fake. Here is the easiest way I’ve found to test it out:
Save the image as a PNG
Go to File>Save A Copy. At the top where the file name is, change the extension to .png. In the dialog box that opens, click OK.
Make a .html file
Open Notepad or TextEdit. Make sure you are in Plain Text mode (rather than Rich Text). Copy and paste the following code (inserting your filename where I have “texture_flame_200.png”):
<html>
<body background="texture_flame_200.png">
</body>
</html>
Save this as a .html file in the same folder as your texture tile.
Open the .html file
Open Finder (or Windows Explorer), go to the folder your .html file is save in, and double-click it.
Your web browser should pop up and display a new tab or window, with your texture tile repeated as a background image.

Here’s my result.
If you don’t like the pattern that emerges, try a few other types of renderings. You can also just undo a couple of steps and start over, since each time you render you get a random result.
Here are some other textures and how I got them:
Filters>Render>Clouds>Difference Clouds

This one is extra-cool because there is a check-box you can select to make the texture tileable right in the dialog window.
Filters>Artistic>Apply Canvas

Default settings. Shown after the Make Seamless filter is applied.

Default settings. Since this gave me a colored image and I wanted a black and white texture, I went up to Colors>Desaturate. I chose the “Average” option, and clicked OK.Then I ran the Make Seamless filter.
If you want your texture’s black and white areas to be reversed, choose Colors>Invert.
Add Some Color
It’s best to make your textures in black and white, and layer them over a color.

First, rename your texture layer in the Layers panel.
Double-click the name, and change the text from “Background” to “Texture”.
Click the “Create New Layer” icon in the Layers panel (the paper sheet icon in the bottom left).

Choose the layer fill type (I chose white, but if your foreground or background is set to the color you want to fill it with, select that), and click OK.
Drag the new layer underneath the texture layer in the Layers panel.
Fill The New Layer With Color
Double-click your foreground color in the Toolbox panel, and choose a new color. I chose tan. Then go to Edit>Fill With FG Color.

Your image won’t change. That’s because your black and white texture is covering the color layer. We need to change the blending mode of the Texture layer.
Select the Texture layer in the Layers panel.
Click the arrows next to Mode, and select Multiply.

You should now see your texture, colored.
If you or your client decides the color needs to be tweaked, it’s easily changed by editing the color layer underneath the texture layer.
You can also try out different blending modes, or decrease the opacity of the texture layer.
Remember to save the .xcf file so that you can come back and make changes, and save copies as PNGs to use in your projects.
You can edit PNGs in GIMP and add layers, but once you save and close the file, the layers are merged and you can no longer edit each separately. If you want to keep the image editable, you need to save it as a .xcf file.
Have another way to create seamless textures?
I’d love to hear it! A more advanced tutorial is in the works for when this one-button method of creating seamless textures doesn’t give you the look you want.
It’s great to see a post about Gimp, I know not everyone can justify the expense of Illustrator and it’s great to see a pro acknowledge that and try to serve the up and coming pro.
I agree, for those of us who can’t get photoshop/illustrator it’s great to see a post about Gimp. Keep ’em coming!
Wowzers! This is so perfect for my current project, I can’t thank you enough :D
“Yes, it’s that easy. Why Photoshop doesn’t have this capability, I have no idea.”
Thumbs up for that! :-)
There are so many things I was scratching my head while using gimp, but this makes seamless tiles really a no brainer!
Thx for sharing this.
Glad you guys found it useful. I hardly ever use GIMP since I have Photoshop and Illustrator, but for this particular function it is invaluable.
I like your tutorial, but every time i try to get something like the B&W image in step 1, it looks nothing like that in the example. I go to Render->Flame and enter in a few values but mine ends up looking a little like a jigsaw puzzle and it doesn’t fill the whole layer.
Maggie: I think I figured out what’s happening. I went and redid the Flame rendering, and I got something completely different both from what I had before and from what you described!
I started over, and clicked “Edit” up at the top of the Flame dialog box, and it turns out that there are dozens of variations within the Flame filter. It randomly picks one. Try looking through them (find them in the dropdown menu next to “variation”) and choosing one for the Flame filter to use.
Let me know if that helps!
Maggie, as it says above in the tutorial
Flame is a very variable filter – you will get something completely different each time. You can find all the variations by clicking the “Edit” button at the top.
So having something different, is completely normal
Nice tutorial. Thank you for providing it.
Ms Wenderlich you are Wunderbar!
Needed this to get over ugly terrain tiling in Unity.
One of the best tutorials for GIMP i’ve ever read. Perfect for a complete beginner. Thanks :)
A Big Hug :D
Thank you so much, you saved my day.
Cheers!
Avn
Thanks for this nice tutorial.Creating seamless bg tiles for any web designer is an essential skill and this was a good refresher for me (I’ve done it in the past but a bit rusty with the process). GIMP is a good free alternative to PSD and sure worth having and using!
(BTW do you know this comment box is not displaying properly in Firefox 21.0?? Check your source and try & fix it?)
Thanks and best wishes :-)
Great tutorial, well documented and clearly explained.
Thanks for sharing!
photoshop has it as an additional plug-in.
btw professional artists tile textures on a hand and they have better quality than using tiling generators.
hand made textures are not cheap
Thanks, Excellent.
You could test final level in GIMP rather than HTML code and browser.
Just go Filters>Map>Tile Options
Many thanks for your excellent post.
This should be in the default gimp documentation.
Thanks very much for this. I knew it was in here somewhere =)
Thanks
As complete novice to GIMP it was a great tutorial I can now create custom tile image for use in Blender and ultimately Trainz simulaator
I use Autodesk RevtLT because I am too poor to afford the suite as a solo draftsman in a relatively remote area of Western Australia. I am also too poor to afford Photoshop. We need to spend our money on shearing shed improvements. This is fantastically simple, well written and a life saver. I know I need to improve my rendering skills to be super fast and efficient if I want to gain access to online freelance work. These simple programs allow for the bottom feeders to get their nose in the trough.
Wow, I am finding the article on this topic. Now I can easily create a seamless texture in gimp. Thanks for sharing with us.
I’m so glad I found this. Thanks!
Thanks so much for sharing — I’ve been wanting this in my gimp skill-set for such a long time!
We on a 2GB RAM have no other option than to use the almighty but lightweight Gimp
I find it easier to use anyways (as a person who never had first hand experience of other editing apps before coming across it
I know it could help create a background for my website and it did
Thanks for showing me the way
#GIMPForever